Fields and Definitions
Print
Modified on: Wed, 29 Jun, 2022 at 3:31 PM
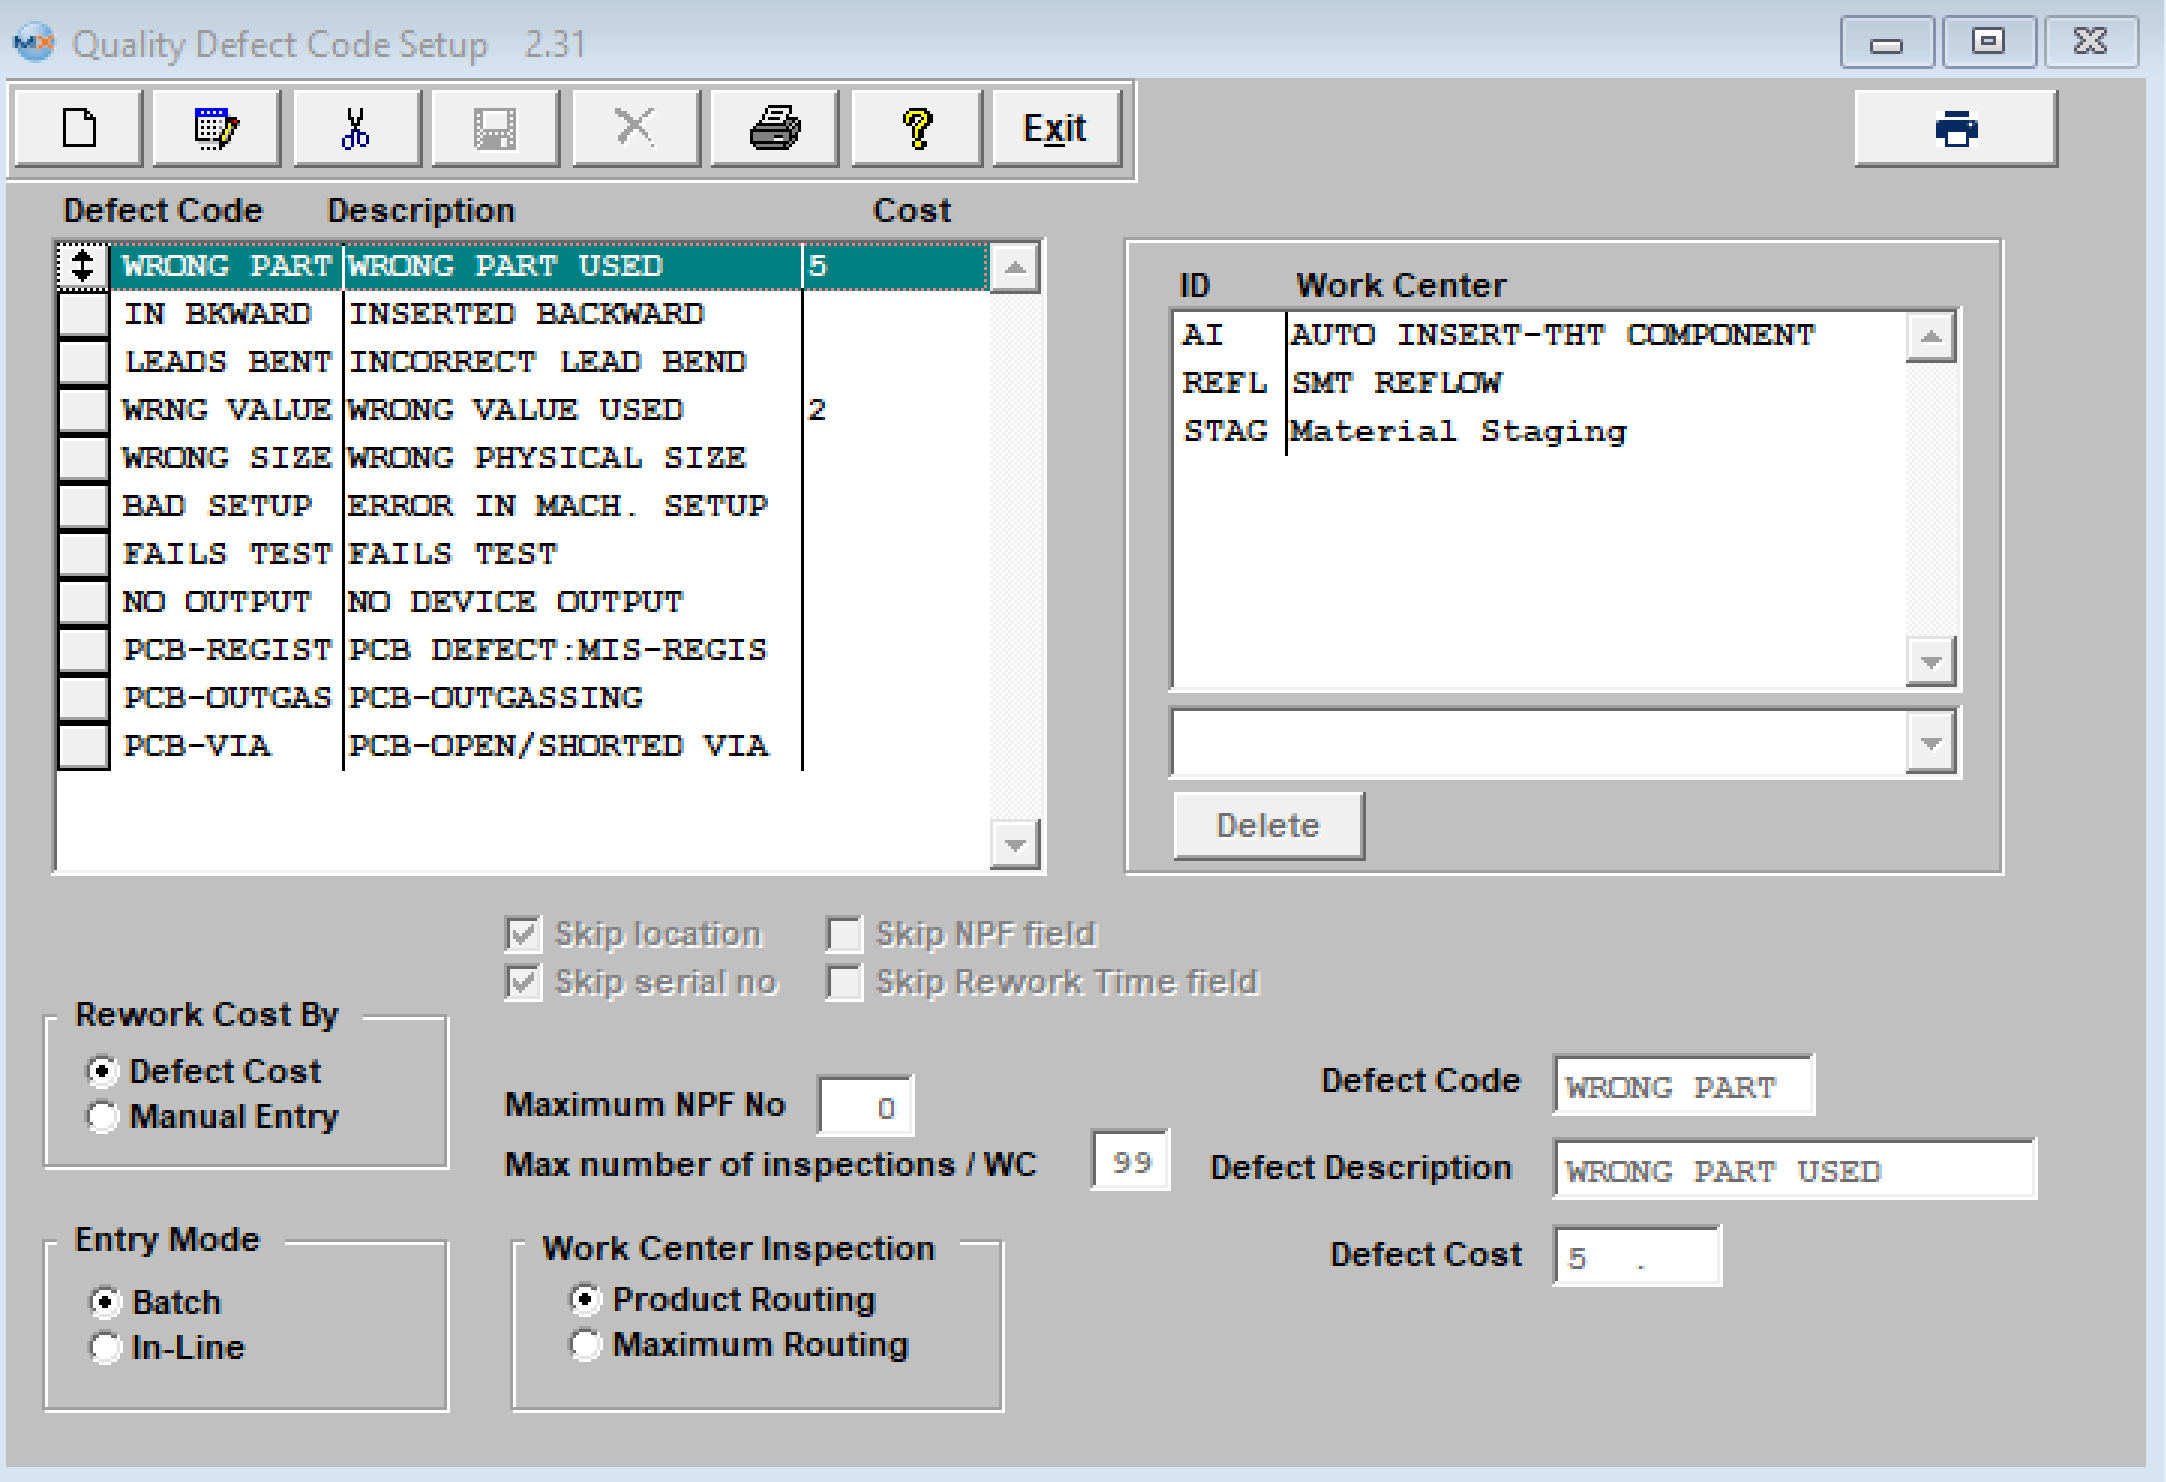
| Entry Mode | Select the default condition for defining the method of data entry. The results of inspection may be entered in manexSQL in two ways:
1. Batch Mode: allows the user to perform the inspection on a batch or lot of materials, and enter the observations at a later time. - In this mode, the user does not automatically forward the product to the next workstation, but merely inspects it and allows production personnel to move the material.
2. In-Line processing: functions as inserting an inspection step at the end of a work center, viewing the parts one at a time, and passing or failing the part. - If the part passes, it is moved by manexSQL to the next work center, and the user has only to physically move the parts to the next workstation. The manexSQL WIP tracking automatically moves the part to the next work center. Parts that fail inspection may stay in their current work center, be moved to another (rework) work center, or passed on to the next work center, at the option and discretion of the operator.
Note: most users prefer to use the batch processing, which accommodates sampling procedures, instead of In-Line processing, and requires 100% inspection.
|
| Rework Cost By | Select to track the costs by either 1. defect cost, or 2. manually. 1. Defect Cost: defining a specific cost for each defect code. 2. Manually: entry of the actual rework time as determined by the inspector during inspection.
|
| Defect Code | Setup the ability to view defects associated with a specific work order during the defect logging and entry process. The user will be presented with a list of defects from which to choose the defect observed. These defect codes and descriptions are entered and defined in this setup. The code is a ten-digit character field that will be used to identify the defects on charts, graphs, and data collected and printed. The user may enter as many defect codes as needed.
- Defect codes can be arranged in any order, but consider placing the most used defect codes at the top of the list. Doing so can save time when entering defects on a lot, as the defect codes are presented in the same order as in the setup.
- The above can be done after defect code entry by clicking on the "REORDER" button, located below the defect codes. After pressing this button, the screen will place a small button in front of each defect code. The user may then use the windows drag & drop function to click on a button, hold the mouse button down and drag the code to the order desired. When done, click on the "DONE" button to secure the order. Alternatively, the user may enter defect codes in alphabetical order, if there are no predominant defects.
- Also, to aid the inspector in selecting a defect code, the user may associate a given defect code with one or more work centers. The user selects from the established work centers to include as many work centers for a specific defect as desired. Work centers may also be deleted from a defect code. In this manner, the inspector will have a smaller list of defects to select from, which would include all of the defects for the work center where the inspection is being performed.
|
Defect Description
| A 20-character field used to further define a defect code.
|
Defect Cost
| The cost is defined by a numeric field formatted as 999.99, and represents the cost of each occurrence of a defect.
|
Work Center Inspection
| Option of viewing defects based on the following two ways: Maximum Routing: will show all defect codes in inspection. Product Routing: will only display those that have been related to a work center where the inspection is taking place. However, the user can still opt to see the max (ALL) defects within the Defect Entry screen
|
Skip Location
| Associated with the Defect Entry screens are subsets of information relating to the defects observed. Some of these subsets may be useful to establish the origin and cause of defects. If the user completes the reference designators in the bill of materials, then entering the reference designation for each defect may provide directions for investigation of repeated failures on an assembly. manexSQL provides the capability to track the defects to locations, but if the user opts not to enter location information, then they may set the default condition of the screen to exclude location information. Checking the “Skip Location” box on the setup screen does this.
|
Skip serial no
| If no serial number tracking is used for defect data collection, then it can be omitted by checking the “Skip Serial No” box on the setup screen.
|
Skip NPF field
| The Skip NPF (no problems found) field will cause the Defect Entry screen to by-pass this information.
|
Maximum NPF No box
| NPF (no problems found) is used to record when observing the product. - If, in the Defect Entry screen, the serial number had previously been rejected, and analysis of the product yields no further problem, either with cosmetics or function, then the user may change this number to "1," which means the first time it was inspected or tested, no problem was found.
- If the product serial number is subsequently rejected again, and a second inspection finds a problem, the number may be incremented to “2.” This will alert users to repeated rejections of a product serial number, one or more times with no discernable defects.
- If the number of times that a part has experienced an NPF exceeds that established here in the system setup, the user will not be allowed to go further.
|
Maximum number of inspections/WC
| For serial number use only. Define how many times a given serial number can pass through a given work center. If “Skip Serial Number” field is selected, the max number will not be visible. - In the Defect Entry screen, once the pass number of a serial number exceeds the max number, as set up here, a supervisor or special rights password is needed to continue. For more information refer to the Implementation: Security.
|
Did you find it helpful?
Yes
No
Send feedback Sorry we couldn't be helpful. Help us improve this article with your feedback.